Lesson 1
local first_name = "Karen";
local last_name = "Cottle";
print(first_name .. " " .. last_name);
Lesson 2
--Create images and assign to variables
--Small icons
local circle01 = display.newImage("Images/Icon.png");
local circle02 = display.newImage("Images/Icon-ldpi.png");
--Large icons as backgrounds
local group01BG = display.newImage("Images/Icon@2x.png");
local group02BG = display.newImage("Images/Icon-72.png");
--Create display groups (kinda like divs)
local group01 = display.newGroup();
local group02 = display.newGroup();
--Add items to groups
group01:insert(group01BG);
group01:insert(circle01);
group02:insert(group02BG);
group02:insert(circle01);
group02:insert(circle02);
group01.x = 100; group01.y = 100;
circle02.x = 150; circle02.y = 150;
circle01.x = 130; circle01.y = 150;
Lesson 3
local _H = display.contentHeight;
local _W = display.contentWidth;
local circle01 = display.newImageRect("images/Icon.png", 120, 120);
circle01:setReferencePoint(display.CenterReferencePoint);
circle01.x = _W/2; circle01.y = _H/2;
Lesson 4
local _H = display.contentHeight
local _W = display.contentWidth
local btn = display.newImage("button.png", 150, 150);
btn:setReferencePoint(display.CenterReferencePoint);
btn.x = _W/2 btn.y = _H/2;
btn.color = "reddish";
local txt = display.newText("Click State", 0 ,0, native.systemFont, 32);
txt:setReferencePoint(display.CenterReferencePoint);
txt.x = _W/2 txt.y = _H/2;
local touchTable = {};
function touchTable:touch(e)
if(e.phase == "began") then
--Do someting during the "began" phase
txt.text = "Began Phase";
elseif (e.phase == "moved") then
--Do something during the "moved" phase
--txt.text = "Moved Phase";
txt.text = btn.color;
elseif (e.phase == "ended") then
--Do something during the "ended" phase
txt.text = "Ended Phase";
end
end
btn:addEventListener("touch", touchTable);
Tutorial
My stab at how my project might be organized:
- App
- Images/
- Entrance/
- Contract/
- Success/
- Data/
- Entrance/
- Contract/
- Success/
- Scripts/
- Entrance/
- Contract/
- Success/
- main.lua
- config.lua
- build.settings
- BYUfont.ttf
STEP 2: (I think I deserve 10 out of 10. Apparently I just need to get used to the fact that these ar going to be hard enough for me that I need to chop up the work. I understand it all though, which is big. I even understand the stuff that I don't need, which is pretty cool too. ...AND because I figured out how to make the posting space on my blog bigger, so my pictures could be bigger. Go me!
Peter, I'm still not sure how you want me up upload a file on here to turn in my main.lua. Its just not possible on blogger. But now that we're over a third of the way through the class, I don't want to waste time changing my PLE...what should I do?)
Lesson 1--Detecting Objects and Screen Taps
- First Part (minus the "self" drama)

- Next phase with only 1 "Touched!"

- Now we're finally to "tapping", and it requires a double tap. Nevermind the random line 6 error. And, I finally made it work when I took out the self and id stuff (we've since worked around this). BUT, it also wouldn't work until I added the "onImageTap" to the event listener as well...that's right, figured that out on my own by looking at other code. :) I felt smart. Yay me!

Lesson 2--Applying Basic Animation
- Fading an object...TADA!

- Moving an object.

- Ok, I think I could spend WAY too much time in the "easing library". But it was awesome.
- Canceling a transition. Ok, so the picture doesn't look like much, but it DID cancel half way through the transition/fade to the bottom right corner.

Lesson 3--Adding Buttons to Your Games and Apps
- Button Widget & Adding a Label--Apparently my computer doesn't like "HelveticaNeue-Bold"...I think I figured out that this is because this font isn't available in my project folder. I don't have any idea how to "find" it to put it in there...I'll have to work on that.
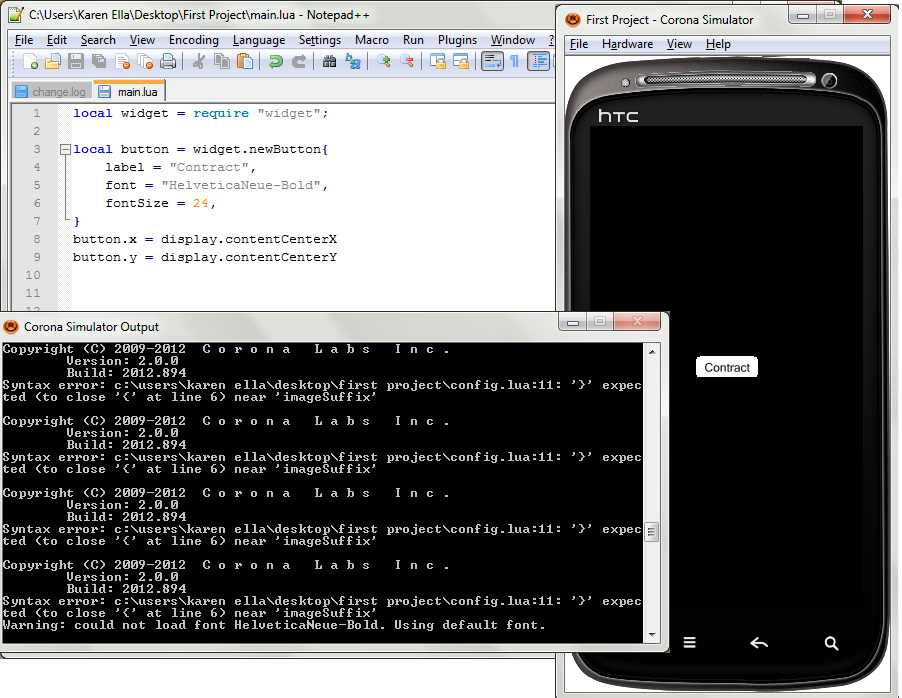
- Adjusting and changing color of a label (xOffset, yOffset, labelColor)--I got tired of the "not recognizing the font" error yelling at me, so I commented out the font. AND, the picture of the simulator is the button being pushed...you can kinda see the emboss...

- Changing text of a button's label--this one confused me for a bit. The label is what the consumer sees...but the text of the button is printed in the Output?! The post says there are several reasons for this, but it would have been nice to know what some of them might be...

- USING MY OWN GRAPHICS!!!! Woot!--I used 44x44 to remind me that that's the optimum (smallest) button size set by Apple...

- BUTTON EVENTS! Woot again! (onPress, onRelease, onDrag, onEvent)--IMPORTANT to remember: the id function is useful if you have the same listener for lots of buttons on a page...that'll be useful.
- ON EVENT

- onPress, onDrag, onRelease are all very similar to the above one, except its only monitoring the one function. So everything that says "onEvent" or "onButtonEvent" in the above example is changed to either press, drag, or release. AND there only needs to be the event.target. No other if or elseif's are needed, BECAUSE you're only monitoring the single phase. Makes sense.
- Image Sheets--I can see how this would be useful if you had a TON of images (like Geri), but I don't think my app will really need that. Yes, I might have 15 or so, but I don't think this is really useful for me. I don't see Sprites coming into play for me.
STEP 3: (I think I deserve 10 out of 10. I learned a LOT. I feel like this guy is really really good at explaining things on my level, which is hard to come by (sad about Rafael Hernandez and Corona). I can see now why people can spend entire courses on Photoshop. And that's only one adobe product. Really phenomenal, and I learned a LOT.)
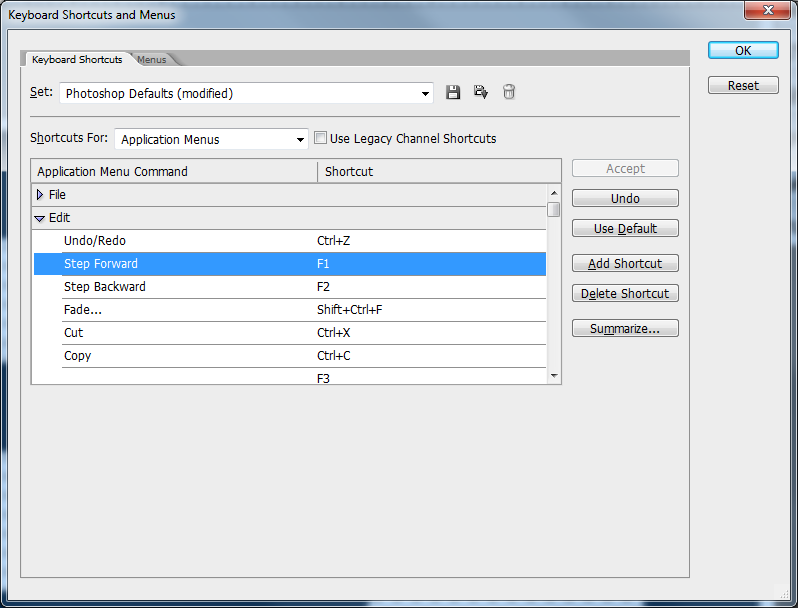
Lesson 1--"My First Rendezvous with Photoshop"
- Create your own shortcuts--this is fantastic. I have keyboard shortcuts I use much more than others, so I like that I can use them. Plus, it was really good to find out what someone who uses Photoshop ALL the time does. Very helpful.
- Optimize the "performance" of Photoshop--kinda just did what he said, but it is good to know what makes it work the best.

- Save your own preferences by naming your "workspace"--you can have multiple workspaces within your Photoshop, named after projects you're working on (this one is called "Karen--Contract App" at the top) that will save your keyboard shortcuts, your menus you've set up, your added colors (like the BYU ones I've added as you can see below) specific to the project you're working on. Awesome sauce.

Lesson 2--"Pixels, Image Size, and Resolution"
- Resolution: PPI = Pixels per inch, DPI = Dots per inch; smaller resolution (used for print), but the smaller will always be worse quality than the larger resolution.
- 300 ppi is about standard resolution for good quality. It will make the image smaller, but better quality (not pixelated). Its always a balance between print size and quality.

- Vector images are resolution INdependent. Photoshop uses pixel images because you can do lots of photographic effects to pixel images.
- ***TAB shows or hides the panels.
- The Crop tool shows the "Rule of Thirds" lines (tiny grey lines below). Very helpful in centering things, as well as composing good photos...but I don't care about that so much right now.

- Ooooh, you can also always add space to your canvas using CROP...which is weird, but awesome. If you select your whole canvas, and then drag it bigger, it automatically adds more space in the color of the "background" color on the bottom of the left panel.

Lesson 3--"Layers, Got to Love Them"...Oooh, I downloaded the source file for this one!
- It's always fascinating to me that the tiny workarounds are the ones that make a program seem more usable. For example: making the thumbnails big enough someone can actually freakin see them, AND being able to rename them to be usable. Again, not really vital, but that kind of thing makes using a program much more enjoyable.

- Oooh, moving layers AND layer structure...good stuff...and makes this program make SO much more sense.

- ****ALT+click on the eye shows one layer and removes all others (and toggles back to normal).
- Click on the word 'Opacity' and drag right or left to change the opacity of that layer (see the pic of Stonehenge)

- Well look at that. Just learned about "MiniBridge" from one sentence in this lesson (good thing I didn't waste one of my 4 on that) ha! You can look up a file in the mini bridge and just drag and drop it into your current file. It's ugly, but its totally useful:

- Layer Groups: quite useful. You can group things together so you can move them all at once (like the title of the pic, the pic, and the black dealy-whopper under the title). Still adjustable alone if you open the "group" in the layers box.

- OOOOH, for duplication, ALT is your best friend. You can highlight them in the layers box, and then either drag them up or down to copy them, OR, while highlighted, you can simply click on the item in the pic while holding down ALT and it will create a duplicate that you can then move. Wow. That's pretty cool.

- Effects...fx. Hmmm. This is fascinating. I'm sure I could spend WAYYY too much time messing around in this, but the shortcuts for applying something you like to the rest of your photos is incredibly useful.

Lesson 4--"Typography, the Art of Text"
- Free type is possible, don't always have to use a text box (hallelujah). Also, by double-clicking the layer, it highlights the text and you can edit it.

- ***Control+Shift+. = bigger text; Control+Shift+, = smaller text...weird shortcut.
- ***OOOOOOOHH, Control+Shift+K = all caps or no caps...that's cool. Wish Word had that.
- ***Control+Shift+ i or u or b = italic, underline, or bold.
- ***Change the "leading" or the space between to lines of text = ALT up or down arrow

- ***Change the "tracking" (all text in a paragraph) or the space right to left = ALT right or left arrow; Change the "kearning" (just specific parts) right or left, same way (really exaggerated in the "alway s" below)

- 3D font! (the little "asdlk" is 3D) Interesting, but not as important as the kearning and tracking from the last step.

And finally, I have created the majority of my buttons (at least the ones I can think of) in Photoshop. I'm still messing around with trying to figure out what the "over" version should look like, but I figure now that I know how to drag and drop fx from one thing to the other, once I figure that out, it won't be hard at all. This was SOOO helpful.
STEP 4: (I think I deserve 12 out of 10 for being able to somewhat decipher what in the WORLD the guy in lesson 3 was talking about...That one was a lot harder. But I THINK I got most of it. I'm proud of me. That's for sure.)
Lesson 1--"How to Use Custom Fonts in Corona"
- Initial Settings: Very useful explanations about the filename vs the font type and where you use them. AND, the comments below were almost more helpful, as they're the most up-to-date.
- For Android: just include the font in your project folder ad specify the FILE name when using the font, not the font name.
- For iOS: you have to put it in the build.settings lua file.

- Using the Font: again, useful to know how to find the list of font names, BUUUUUTTTT its only on "my" local system. They may not work on someone else's which is why its so important to put the font file in your project file.

- And, here's my handy-dandy Palatino Linotype, BYU-approved font:

- Handling Older Devices: I don't really think I will run into this in the future, BUT, let's be honest, just because Mr. Beebe thinks this is an "easy work-around", I don't. SO, here's it functioning with Palatino, perhaps for later usage:

Lesson 2--"Text Input with Native UI"
- Text fields vs text boxes: TEXT FIELDS. They will be my friend. Text fields are one line only, and can be used for password fields. Now, that's assuming that there's not a set one for CAS...
- Events and Listeners: hmmm, I think this is really useful information, but I think mine will be overridden by the CAS authentication that we have to tap into. Either way though:
- userInput phases:
- Began: when the keyboard appears on the screen
- Editing: when they're typing
- Ended: when it loses focus, ie. user taps into another input field
- Submitted: when they press enter or submit the contents of their input
- Don't forget to remove them when you're done too with object:removeSelf() and set the variable to nil.
- While this doesn't show up on the simulator, it's still good code to have record of:

- Basic Note App:
- 1. Creating the interface. I love how this guy says this step is pretty straight-forward....straight-forward my keister! But, I did learn a lot in here. AND, I really like the explanations of what in the world is going on in the code. There are some possible really important things in there:
- "create a gradient for the top-half of the toolbar"
- "create toolbar to go at the top of the screen"
- MAYBE "create text to go on toolbar"...but I'm not sure that will work. I think the things on my toolbar will need to be functional buttons...
- ***"create button"
- ***"onRelease listener callback for loadBtn" !!!!!

- 2. Text Box and Text Field: IMPORTANT: text boxes are read-only by default, so you can change that by changing the "isEditable" property to true.

BUILD FOR DEVICE. Well, I tried.
- 3. Saving and Loading: Can't get much further than a brick wall...but, here's the proof that I tried:

Lesson 3--"Scopes for Functions" (Wow, this is no longer Mr. Beebe...this one is very hard to follow. Fluent in Lua, NOT in English...)
- Forward Declarations: sometimes you need to pre-declare a function...I wish he would have said when. This one:
- calls init
- which calls main
- AAANNNDDD, "for forward declaration we declare that main is a local variable by declaring it"...what in the world?
- define main as a function WITHOUT the local in front of it...

- Encapsulated Function: if you want a function that is ONLY available from inside a function...
- Ok, so I think I get it. This is a way of having a class of functions related to one object without creating a class. I THINK this means you can have a whole bunch of functions that you call by only calling one object, because the way its coded, they're all in a "class" together. I hope. (I touched it four separate times. It's not schizo.)

- Member functions: accessing things from outside of a function.
- *If we were calling it from INSIDE, it would be self.changeColor({255,0,255})

- Cross Calling: how to call a function from inside a completely different function. Whoa. This one is hurting my head. BUT, I think I understand the point...just not when I would use it. You can't use self, because its inside of another function. The only way to get to it is to use function names.

- Advanced Function: I tried. I'm not even going to pretend I had any idea what was meant by:
- "...coz we have assigned hide to the function print and the local variable print to the function math.random." Holy...

STEP 5: (I'll be straight up honest: think I deserve 10 out of 10 for trudging through. I seriously was stuck. And SOOO frustrated by not being able to figure out what I was doing wrongly. BUT, I finally made it through, stuck with it until I found the random stupid error. Once upon a time, you told us that was just part of coding. I listened: I even went and got my boss (non-coder) to just come in and see if she could see anything. It wasn't her that found it, but just having her stare at it made something click. BOOM, I could finally move on. And OH MY GRACIOUS, thank you for your help on the end!!!)
Lesson 1--"Storyboard Basic Usage"
- Well ok. I've been trying to figure this one out for two days now. I just assumed it was my dumb trial version of Corona on my laptop that was giving me fits. Turns out not. So, I did everything that was mentioned in this tutorial, and I STILL can't get anything to show in the simulator. BUT, the output says its functioning just fine (the two times it didn't, I was trying to change things). The good news is. I think I understand.

- As I understand it, "createScene" allows me to call the next storyboard I want and "destroyScene" makes it go away (so the next one can come into view). However, that doesn't mean its really gone...which makes me think if it's not really gone it'll probably continue to slow optimum speed. SO, I have to remember to purge it when I'm done with by setting "storyboard:purgeOnSceneChange" to true in my main.lua. I think I get all that. I guess we'll see. :) Hopefully the next tutorial will produce something on my simulator to let me know I'm actually doing this right...hopefully....
- So, I did not understand that you have to have a "main.lua" and a "scene_.lua" to make this work. I guess I knew that this would be true eventually, but I did not understand from the tutorial that this was for NOW. Good heavens...lights are turning on everywhere. Ugh. Wow. BIG brain cramp finally loosened. SO, NOW, here's what my screen looks like (pardon the next stuff commented out)...

- Though...nothing ever "printed, CALLED WHEN SCENE IS UNLOADED"...huh....
- OOOOhhhh, options! Awesome. Love this. I love all the crazy ones they have. That sucker is flying and twirling in. THOUGH, I'm guessing I will probably use something simple like "slideLeft" or "slideUP" or something. I'm not sure though...I don't want to provide the illusion that they can slide back up out of the app...if that makes sense?!

Lesson 2--"Storyboard: Scene Purging vs Removal"
- Memory Consumption: Ooooh, I think I caught onto this one lesson early! Ha!
- Purging: frees texture memory (its not really gone).........I'm not really seeing where this would be important for me. Well, I guess its either I don't need it at all, or its all I use. Depending on whether I wanna let them go back through the process at all...huh....interesting....
- Removal: frees texture AND lua memory (its really gone) THEREBY allowing improvement of performance (speed).
- Functions for Purging:
- "storyboard.purgeScene(sceneName)" --> IF the scene I want purged is a whole module, its just the name of it minus the .lua. FYI.
- BUT, do this AFTER "didSceneExit"
- ***ALSO, he stuck the "self.view" up in the properties of the image definition instead of doing it on its own line with the insert...
- Oooh, this menu example is what you would do if you had no idea where the person was coming from when they came back to the main menu. That makes sense.

- **I agree with Geri. I wish he'd taught us how to transition from one to the other, but...baby steps. ;)
- Functions for Removing: they're much the same as the ones for purging.
- Auto Purge: in iOS if the memory is getting low, it will automatically purge the least recently used thing. If you don't want it to do so, you can put "storyboard.disableAutoPurge = true"...but I'm not really sure I'll need this. I'd like to think my app won't ever be that huge...just sayin...
- ******OOOOHHH, I like this one: "storyboard.purgeOnSceneChange = true"...I think this will work the best for me!
Lesson 3--"Kitchen Sink and STORYBOARD Source Code" (Ahhh, I missed that very important word...sheesh...)
- Holy gracious. This is incredibly useful. I wasted a lot of time before I found what I was really supposed to be looking at. Here's my feeble attempt to do this. :) This is AWESOME. I'm really excited. Mostly because, I THINK I actually might understand what the crap is goin on when I look at a lua file...jeepers!!!
- NEW BEST FRIEND: "screentemplate.lua"
- This shot is of the switch between scene4 and scene1...obviously I gotta watch my font size. :)

Lesson 4--"Screen Overlays and Parameter Passing"
- Parameter Passing: AAANNNDDD, suddenly my brain has kinda turned on. This made sense to me. I'm also pretty sure its really important for what I'm trying to do, but, I'm not sure. Ha! I guess we'll see.

- Scene Overlays: oooh, this looks important. It SOUNDS like what people call "light boxes" when you click on something and it kinda comes forward while the rest of the site turns dark... Once upon a time, this is how I saw the "clauses" on the contracts working. But I think now it has been decided that I'll have to go with the accordion thing instead. BUT, it may come back to this...
- An overlay screen is completely dependent upon the screen is was originally called from. So, if you ditch the original screen, the overlay will ditch too.
- MAGICAL!!! SERIOUSLY, wouldn't have been able to figure this out, nor keep my hair without your help! Thank you!!!

STEP 6: (I think I deserve 10 out of 10 because I got all the way through this even WITH the author's mistakes. :) This is getting fun. I never thought I'd say that. And I'm SURE I will lose more hair before I'm done with this, but still. Thanks!)
Lesson 1--"Creating Lists with the TableView Widget"
- Creating the Widget...fairly straightforward. But it was really great that they offer you a "how to create a mask" for the widget tutorial right there. I did that one too...ya, simple, but I feel like its going to prove VERY important. THIS IS HOW I CREATE SCROLLING LISTS!!!
- "....important to note that widgets will not be clipped properly unless you specify a compatible mask file."

- Inserting and Deleting Rows
- Images are better for performance than (vector) shapes and text.
- DEFINITELY return to this one for more info on optimizing the performance of scrolling!!!
- Adding Several Rows
- WOOO HOOOOO!!! It worked!!! I love it! The last one didn't, so I was worried. However, its still not displaying the text...WOO HOO! I changed the color, and the size...its still freakin out though. I'm not sure what's going on, except I believe its not doing well displaying the individual row numbers...Or maybe its displaying them all? It looks like it DOES get the "unique row" thing...

- OH MY HOLY JUNK I FIGURED IT OUT. Ok, that still wigs me out when I actually figure out what the tutorial writer has left out. WOW. That's some scary shiz. :) Well, here's how its SUPPOSED to look. :) I also figured out it WAS scrolling, I was just scrolling the wrong way, like a moron.

- Handling Row Touches: SO, here's an interesting one. I've been trying to make myself do the whole, "Karen, what do you EXPECT to have happen?" thing when I code. Turns out, it was REALLY helpful here. Almost like my own little secondary "output" checker. Anyway, when I first typed this code, here's what came out:

- The only thing that looks right is the "LEFT" and "RIGHT"s that you can see. For some reason, the words were moving over to the left off the screen, AND, it wasn't actually printing (as far as I could see) the "Touched row with id..." thingy in the output window like I was expecting. Now I think I've figured out that its printing it on the screen. I just can't see it (too far over). I changed it just a little bit so I could see if it was really working, and it it. But apparently the "reRender" only pertains to the rows that are "pressed"....which actually makes total sense.
- OH MY HOLY STUPID CAPITAL P!!!!!!!!!!!!!!!!!! (on the "point" in setting my reference point) Good moses.....that nearly killed me. Dumb. BUT, I found it. AND, now its totally functional. WOO HOOO!!!!! It's a Christmas miracle...

- Category Items: so I read through this. And I understand it....I just don't think I'll use it for anything. I also studied Geri's Step 6, and I can see how she'll use the table and the scrolly function, TOTALLY. But as for Categorizing them? I'm guessing that's for if someone wants to "choose" more than one row and have them do exactly the same thing? I just don't see how that will be useful in my app.
- Ok, so SOMETIMES I get really mad when I see that the kitchen sink holds PERFECT examples of what I've struggled through above! bah! But, alas. I guess its good because I learned more. The Category option makes a LOAD more sense now that I've seen "ListView2" from the kitchen sink. (Not sure why Geri's didn't make sense to me, but...) I can see why people would use this. I don't believe I will, unless I continue on with this project in 760 and build out the "view my signed contracts" option. THEN I can see using the categories, but still that might not work given that the number of rows in each category would be variable.
Lesson 1--Understanding LUA Tables in Corona SDK
- What are tables? Tables are like dressers. Drawers are "keys" and the stuff you put in the drawers is "value". And, in Corona you can put a whole dresser in a drawer.
- Defining Tables:
- LUA knows its a table because of the curly brackets
- Tables as Arrays

- You access the data you want by putting the number in the square brackets (ie. colorTable[3])
- Tables as Dictionaries
- Keys don't have to be numerical. You can also name them something associated with what the value is, which is sometimes a whole lot easier to remember.
- ***ALSO, you can totally add keys outside of the defined table, which is FUNKY, but probably really useful.
- You can also mix and match, but that just sounds so crazy confusing, I don't really wanna get into that. Fingers crossed that my data doesn't make me. Ha!
- ***Two ways to access data:
- colorTable.sky
- colorTable["sky"]

- Data Types
- Tables can hold any kind of data: functions, other tables, you name it.
- In the example below, the Table is called people. The Keys are numerical. And the data being accessed are within those keys, which actually have tables within each key....if I'm not crazy.

- There's no limit to how many tables you can store within tables.
- ***When tables get huge, start looking at what's in between the commas as a line of code on its own. That's the best way to start digging.

- Tables and Loops
- ".....the ability to "iterate" over the keys of a table with a loop." That's why people do tables instead of normal variables.

- IF ITS NOT NUMERICAL: use the pairs() function instead...see below:
- NO IDEA why it switched up the order...

Lesson 2--LUA tables forum
- Hmmm, Mr. Gammon says there's no way to know what order its going to print things in because of something called "hashing", except to use numerical keys....doh....
- **Also, Mr. Gammon needs an instructional designer...i HATE forums that are so unreadable as this. it's like they know how to code a nice site, but refuse to do so on forums....
- **Also, I tried all his stuff before this, but my computer really freaked out when it tried to understand "tprint". I searched the site to download his little gadget he wrote called tprint, but i got nothin. So, I can show you this! It worked!

- You delete a table item by assigning "nil" to it.
- "table.foreach" will tell you everything in a table, kinda like an "info dump" of sorts

- but its also just like Mr. Beebe's pair() function.
- foreach can also find a particular entry in a table, which seems like it'd be useful:

- TABLES AS VECTORS--for accessing data in a particular order. This is how I'll have to do it. "foreachi" iterates over the numeric keys. BUT, they have to be all in numerical order, there cannot be holes in the numbering. It stops when it finds a gap.

- "table.insert" adds an entry at the end of the list, OR you can specify it in the "insert" function and they'll all be shoved down by one.

- table.remove() just deletes the last entry, or you can specify it: table.remove(t, 5), after which, it will most likely resequence (renumber).
- table.concat(t, ",") will turn it into a string. (he also talks about sorting the key, but i got lost in it and cannot really see how that would help me)
- SOPHISTICATED TABLE ACCESS THROUGH META-TABLES.........ok, its official. I'm now in over my head. I didn't really understand WHY I'd do the following, but I'm pretty sure I can explain WHAT it's doing...

Lesson 3--Manipulating LUA tables
- Advanced functionalities:

- Ah. I also expected the following code to produce "two" instead of "due" like it did. I think I understand their warning: sometimes we want it to just duplicate (or spit out) the information, but instead we point it to a place of memory??....I think I'm getting tired.

- OOOOH, I do like this list of built-in functions for tables though....
- table.concat()
- table.copy()
- table.indexOf()
- table.insert()
- table.maxn()
- table.remove()
- table.sort()
STEP 8: (I think I deserve 10 out of 10. It was relatively easy comparatively, but it was full of a lot of important information. I do believe I understand XML and how it works now. Hopefully in the next step I'll learn how to make Corona and XML talk to one another. We're getting there. Yeeshk. We're getting there.)
Lesson 1--Understanding XML Basics (W3 schools)
- Intro:
- eXtensible Markup Language--designed to transport and store data (not display it); a software and hardware independent tool for carrying info.
- I can define my own tags in my own structure...this is sounding awesome, but VERY ominous...
- ALSO, I'm guessing my tags will come directly from the code I got from my stakeholders. (seen below)
- XML is a complement to HTML...I'm gonna make an assumption here (though I think I'm right) that I can replace HTML with CORONA. So, XML is a complement to Corona.
- How to use:
- stores data in a separate file so you can focus Corona on the way it looks without messing with the actual data
- makes data sharing and transport AND platform changes easier
- Tree:
- "start at the root, branch to the leaves"
- Root = parent
- then child
- then subchild
- things on the same level are siblings
- all elements can have content and attributes
- SO, in my example below, the root is "start"
- The next level is "y_contract_xmlp"
- Then there's a load and a half of subchildren...and maybe even lower levels, but I can't tell at all right now (ooooh, apparently my work compy can read this in a much more intelligible way):

- Syntax:
- All XML tags must ALSO be closed. (except the XML declaration at the top...mind you, I find it fascinating that in everything I've seen on W3schools there's a version in there, but in the code I got from the stakeholders, there's not one...)
- Whoa. Tags are cAsE sEnSiTiVe. (I hate it when people do that, I was just itching to put it in here.)
- In XML, all tags must be nested correctly...again, we're getting to the ominous...-ity again.
- All ATTRIBUTES must be quoted. All of them. That's important.
- Ooooh, 5 things you normally type that are a problem in XML. Type the thing that starts with an ampersand (on the left) instead of the thing in the middle when you're trying to come up with the thing on the right. :)
< < less than > > greater than & & ampersand ' ' apostrophe " " quotation mark
Lesson 1--How to Use XML files in Corona

 Lesson 2--Manipulating Lua Tables pt 2
| |
No comments:
Post a Comment